- Total:
- 1 hr 30 min
- Prep:
- 40 min
- Cook:
- 50 min
- Yield:
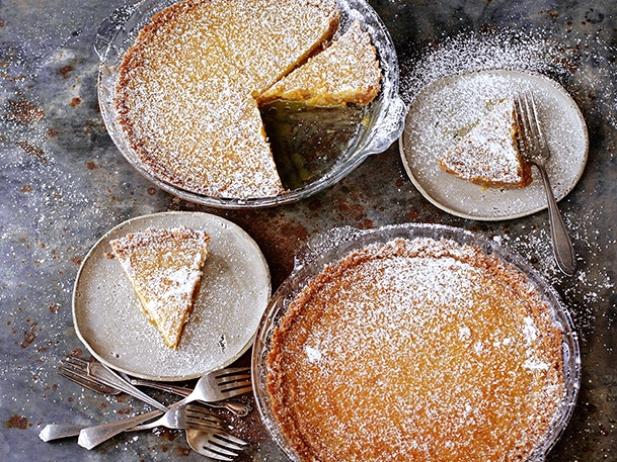
- Two 10" pies
Ingredients
Crack Pie:
- 1/4 cup butter
- 1 recipe Oat Cookie (recipe follows)
- 1 1/2 tablespoons light brown sugar
- 1/8 teaspoon salt
- 1 recipe Crack Pie Filling (recipe follows)
- dusting of confectioner's sugar
Oat Cookie:
- 1/2 cup butter
- 1/3 cup light brown sugar, tightly packed
- 3 Tablespoons sugar
- 1 egg yolk
- 1/2 cup + 1 tablespoon flour
- 1 cup rolled oats
- scant 1/8 teaspoon baking powder
- pinch baking soda
- 3/4 teaspoon salt
Filling for Crack Pie:
- 1 cup butter
- 1 1/2 cups sugar
- 1 cup light brown sugar
- 1 1/2 teaspoon salt
- 1/4 cup milk powder
- 3/4 cup + 2 tablespoons heavy cream
- 1 teaspoon vanilla extract
- 8 egg yolks
Directions
Crack Pie:
To make pie: Heat the oven to 350 degrees.In a microwave, gently melt your butter on a med/low setting for 15-30 seconds. Let it cool until it is not hot to the touch before proceeding.
Put the oat cookie, brown sugar and salt in the food processor and pulse it on and off until the cookie is broken down into a wet sand. (If you don't have a food processor, you can fake it till you make it and crumble the oat cookie diligently with your hands.)
Transfer the cookie crumbs to a bowl and, with your hands, knead the butter and ground cookie mixture until the contents of the bowl are moist enough to knead into a ball. If it is not moist enough to do so, gently melt and additional 15-25g of butter and knead it into the oat crust mixture. Divide the oat crust evenly over two 10" pie tins (two pies is always better than one).
Using your fingers and the palm of your hand, press the oat cookie crust firmly into both 10-inch pie shells. Make sure the bottom and the walls of the pie shells are evenly covered. Use the pie shells immediately or, wrapped well in plastic, store the pie shells at room temperature for up to 5 days or in the fridge for up to 2 weeks.
Place both pie shells on a 1/2 sheet pan. Divide the crack pie filling evenly over both crusts. The filling should fill the crusts 3/4 way full. And bake at 350F for 20 minutes. During this time, the crack pie will still be very jiggly, but should become golden brown on top. Know your oven, which corners bake your cookies or pies lighter or darker and take these nooks into consideration when placing your pies in the oven-use the shelf and corners that brown your baked goods best.
At 20 minutes, open the oven door and reduce the baking temperature to 325F Depending on your oven this will take 5-10 minutes-keep the pies in the oven during this process. When the oven reads 325F, close the door and finish baking the crack pie for 5 minutes.
At 5 minutes, the crack pie should still be jiggly in the bulls eye center, but not in the outer center circle. If the crack pie is still too jiggly, leave the pies in the oven an additional 5 minutes in the 325F oven.
Gently take the half sheet pan of crack pies out of the oven and transfer to a rack to cool at room temperature. You can speed up the cooling process by carefully transferring the pies to the fridge or freezer if you're in a hurry. Freeze your pie for as little as 3 hours or overnight to condense the filling for a dense final product-the signature of a perfectly executed crack pie.
Wrap the crack pies if you are not serving them right away. Decorate your pies with 10x through a fine sieve or the pinch of your fingers.
Oat Cookie:
To make oat cookie: Heat the oven to 350F.In a stand mixer with the paddle attachment, cream butter and sugars on medium high for 2 to 3 minutes until fluffy and pale yellow in color. Scrape down the sides of the mixing bowl with a spatula.
On a lower speed, add egg to incorporate. Increase the speed back up to a medium high for 1 to 2 minutes until the sugar granules fully dissolve and the mixture is a pale white color.
On a lower speed, add the flour, oats, baking powder, baking soda, and salt. Mix 60-75 sec until your dough comes together and all remnants of dry ingredients have incorporated. Your dough will still be a slightly fluffy, butter fatty mixture in comparison to your average cookie dough. Scrape down the sides of the mixing bowl with a spatula.
Pam spray and line a quarter sheet pan with parchment or a Silpat. Plop the oat cookie dough in the center of the pan and with a spatula, spread it out until it is 1/4" thick. The dough won't end up covering the entire pan, this is okay. Bake the oat cookie at 350F for 15 minutes.
Cool completely before using in the crack pie recipe.
Filling for Crack Pie:
To make filling: In a microwave, gently melt the butter down in 15-second intervals. Make sure it is not hot to the touch.In a stand mixer with the paddle attachment on low speed, mix together the dry ingredients until they are evenly distributed. If you try to mix the crack pie filling in on any higher than a low speed, you will incorporate too much air in the following steps and your pie will not be dense an gooey- the essence of the crack pie.
Add the melted butter to the mixer and paddle until all the dry ingredients are moist.
Add the heavy cream and vanilla and mix until the white from the cream has completely disappeared into the mixture. Scrape down the sides of the bowl with a spatula.
Add the egg yolks to the mixer, paddling them in to the mixture just to combine. Be careful not to aerate the mixture.
This recipe was provided by a chef, restaurant or culinary professional. It has not been tested for home use.
Recipe courtesy of David Chang, Momofuku


